Summer time approaches and the days seem to get just a bit easier! People are starting to catch up on things, delete old emails, and clean out old files. What? Your people don’t automatically delete files that aren’t needed anymore? You are telling me that they expect you to keep and backup everything that they have ever created! It is time to clean out the trash and free up some space. Lucky for us, this whole process becomes super easy when we start deleting old files with PowerShell!
Before we jump to the script, you will need to decide on two things. First, what is the oldest file that you want? We will measure this by the date accessed attribute. For our environment, we delete any file that hasn’t been used for three years. If today is June 1st, we only want files newer than 06/01/2011.
Second, you will need to think about any files to exclude. For example, you might have log files, videos, or records that should never be deleted. If you have files like this, you will need to create a CSV to exclude them.
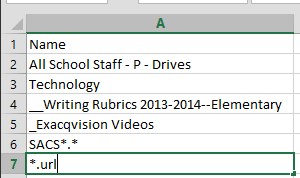
At the top of your CSV, enter Name. In the lines below, you can either specify folder names, file names, or a mixture. The screenshot above shows a few different examples including some with wildcards. Got your maximum age in mind and your exclusion CSV create? Great – let’s create our PowerShell cleanup script.
Our Deleting Old Files with PowerShell Script
Launch PowerShell ISE and paste the script below. On the second $exclusions line, change the import-csv command so that it points to your new CSV. In the $Directory line, replace \\SERVER\SHARE and specify the share that you want to clean up. In that same line, change the Last Access Time date to match your maximum file age.
# The line below is the path to the exceptions file - one entry per line
$exclusions = @()
$exclusions = import-csv .\exclusions.csv

#The line below deletes everything EXCEPT what is in the exclusion file.
Clear-Variable Directory -ErrorAction SilentlyContinue
$Directory = Get-ChildItem \\SERVER\SHARE -Recurse | where-object { $_.LastAccessTime -lt "06/01/2011" } | sort Name |select name,fullname,lastaccesstime


foreach ($exclusion in $exclusions){
$Exclusion = $exclusion.name
$Directory = $Directory | Where-Object {$_.FullName -notlike "*$exclusion*"}

}

$Directory | export-csv .\Deleted.csv -NoTypeInformation -Append
$Directory.fullname | remove-item -Recurse -whatif -Verbose
You can now run this script to test your results. Any file that will be deleted will be recorded in a Deleted.CSV file. This file is created in the current run path of your PowerShell console. When you get ready to run this script in live action mode, remove the -whatif parameter in the very last line. If you have multiple shares to clean up, you can create a new variable name $Shares and have the script walk through each item.
This is how we keep our file hoarders at bay! If you have any suggestions to improve this script, leave a comment below. If you use another method, I would love to hear about it!