Folder Redirection, when properly setup, can provide a huge amount of value for your organization. It separates the connection between user and computer. Staff can move between computers and have access to any data that they need. Enabling it is easy but that is where most IT departments stop. Perfecting it takes a bit more work.
Over the next few posts, we are going to cover folder redirection and the other tools you can use to extend it. These will include DFS namespaces, data deduplication, Volume Shadow Services, Offline Files, Security, and remote file access. As you can see, we have a lot to cover! Today, we are going to setup a DFS Namespace. Our next post will enable folder redirection and configure our file system security permissions.
What are DFS Namespaces and why should I care?
DFS can be divided into two technologies: DFS Namespaces and DFS Replication. These are commonly abbreviated to DFS-N and DFS-R. The first one, DFS-N, allows you to move away from the traditional \\SERVER\Share method of file access. Instead, you create a namespace and point locations in the namespace to specific servers. This is essentially how you can go to \\DOMAIN-Name\SYSVOL and access the SYSVOL directory in C:\Windows\ of your closest domain controller.
What are the advantages of using a namespace when you have to create the shares on a server anyways? For me, there are two:
- Reduce IT overhead. You can point your software shares, folder redirection, home folders, shared drives, etc to one namespace. You don’t have to remember which server holds what data – you just go to \\DOMAIN-NAME\data (or whatever you name your DFS Namespace). You are pointed to the correct server through the magic of Directory Services!
- A more agile environment. You are no longer tied to specific servers paths. If you want to move data to a new server, you can do so without breaking shortcuts or processes! End users and services have no idea that the data in the background has been moved.
DFS-R is another animal. DFS-R is great when you have multiple sites and you want data to replicate between them. It allows you to host data between two servers and keep that data in sync. Personally, I’ve had bad experiences with DFS-R and real time data access. The issue is always related to users having multiple paths to modify data. The trick to successful DFS-R implementation is to understand replication status and supported configurations. You can read all about that here. Back to our topic now!
Creating and configuring your first DFS Namespace
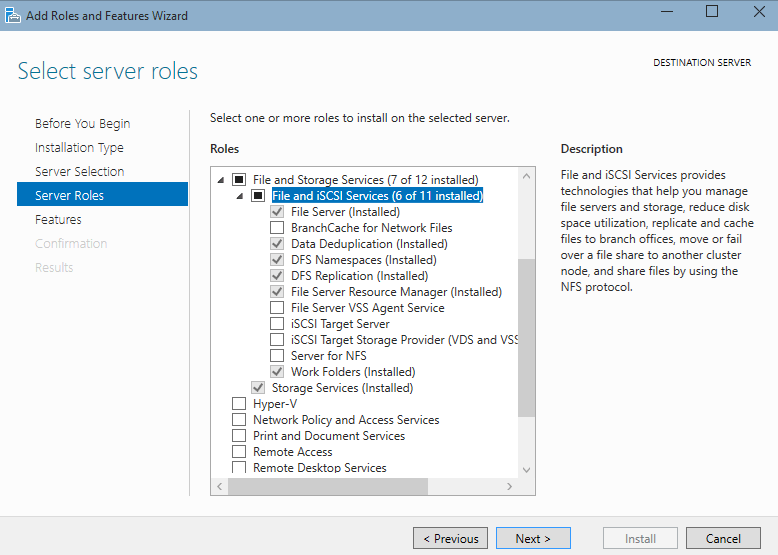
On your file server, launch the Add Roles and Features Wizard. Under Server roles, select DFS Namespaces. In the screenshot below, I also installed the Data Deduplication service, DFS replication, File Server Resource Manager, and the Work Folders role (for remote file access).
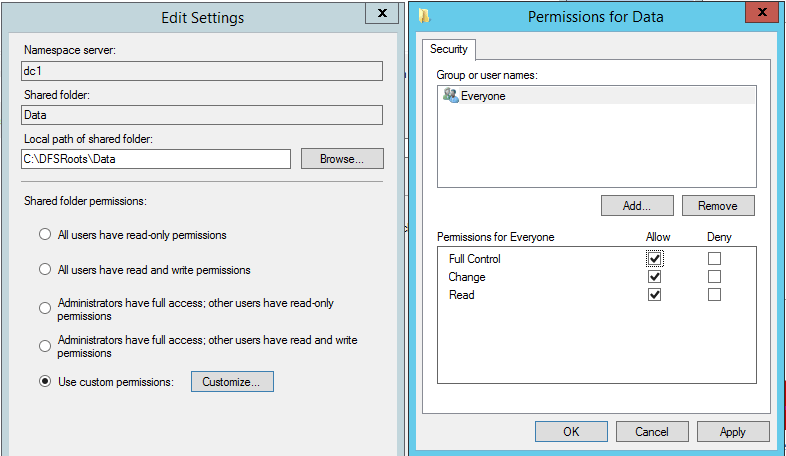
After the roles have installed, launch the DFS Management MMC. Right click on Namespaces and select New Namespace. Browse to your server and then press next. Give your Namespace a name – for example data or users. Change the local path of the shared folder to the correct location. You probably do not want to use the default location of C:\DFSRoots\Data. Under Shared folder permissions, select customize and give Everyone the Full Control Permission. You will be using local security permissions to control access.
On the Namespace Type screen, accept the default selections of Domain-based and Enable Windows Server 2008 mode. This will allow you to use Access-based enumeration (users do not see files that they can not read). If your domain level is 2003, you will want to raise it first before creating a namespace. This is my go-to article on raising the domain or forest functional level.
Continue through the wizard and finish creating your namespace. And that is it! You now have your very own DFS namespace! 🙂
In our next post, we go from a fancy folder to a fancy folder with some data in it.